How to Assemble a Pie Slice Box
Complete step-by-step instructions for assembling a pie slice box. Perfect for individual pie slices and wedge-shaped treats.
Estimated time: 3-5 minutes
1 assembled pie slice box
Pie Slice Box Kit
Flat work surface
-
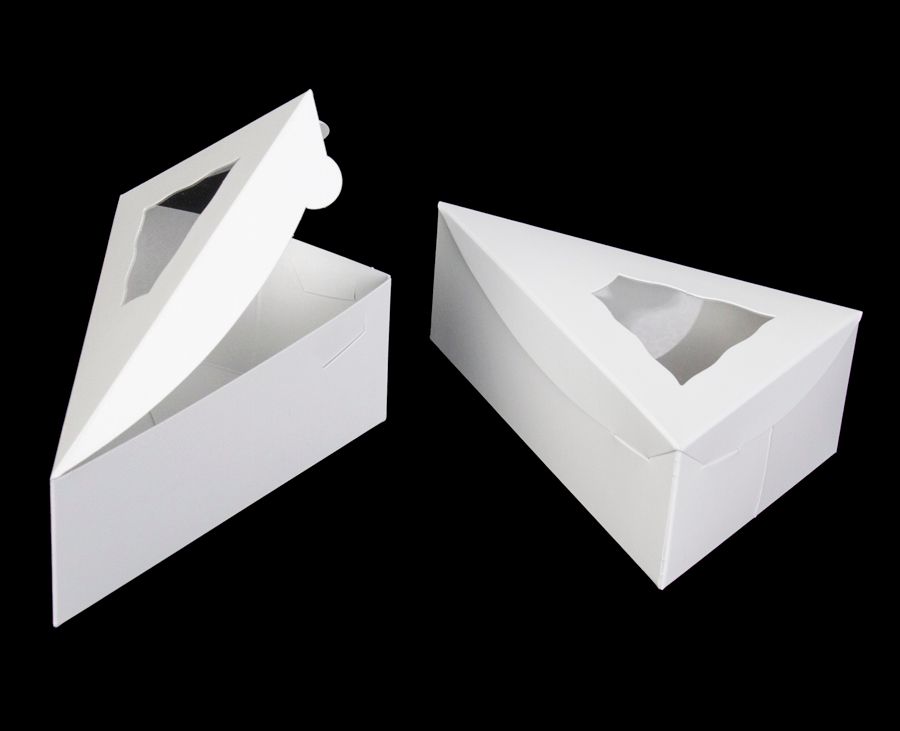
View the completed box
The picture below is what the pie slice box will look like once you finish these instructions.

-
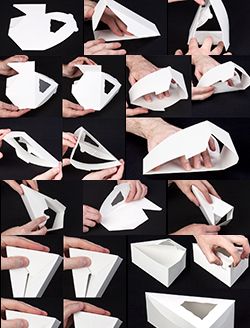
Start with the flat structure
This is what the structure looks like when you first take it out of the shipping box.

-
Pre-break the longest score
To begin setting up your pie slice box, lay the flat-packed box with the window facing down and pre-break (fold) along the longest score. Fold the lid over all the way, 180 degrees.

-
Complete lid pre-breaking
Continue folding the lid all the way over to 180 degrees.

-
Pre-break the lid edge flaps
Next, fold the two flaps on the edge of the lid all the way over. This pre-breaking of scores trains the paperboard to have sharp creases. It makes the box easier to set up and the angles will look crisp and sharp too.

-
Complete flap pre-breaking
Continue pre-breaking both lid flaps completely.

-
Form the triangular shape
Pick up the box with both hands - one hand at each of the furthest ends. With light even pressure push the ends towards one another causing the three creases at the back of the box to start to move. Keep pushing on the ends until the box looks like a triangle or wedge when viewed from above.

-
Pre-break bottom panels
We are close to being finished! Pre-break the bottom panels by folding them in and back out again, one at a time. The easiest way to do this is to use one hand to pin down the inside wall adjacent to the bottom panel. To get the best looking finished box, make sure you fold all of these creases all of the way to the end of the score.

-
Continue bottom panel pre-breaking
Continue pre-breaking the remaining bottom panels.

-
Complete all bottom panel pre-breaking
After pre-breaking the crease on each panel, fold the panel back out and move on to the remaining panels and do the same.

-
Fold bottom panel 1
Now it is time to fold the panels by the numbers. Fold bottom panel 1 till it is at a 90 degree angle with its adjacent side panel.

-
Fold bottom panel 2
Fold bottom panel 2 until it rests on top of panel 1.

-
Fold panel 3 and hook the tab
Finally, fold panel 3 over and keep going until the little tab on panel 3 hooks under panel 1. Panel 3's tab is sandwiched between panels 1 and 2.

-
Close the lid
Closing the lid is a matter of folding it over and making sure the flaps coming off of the lid go on the outside of the box. The two tabs near the back corner of the box can be inserted both at the same time using your thumb and finger of the same hand.

-
Assembly complete - video tutorial available
You did it. You made it through the instructions and should now have a box that is ready to receive a slice of your pie. If you are more of a video person, we put together a short movie showing how to set up your pie slice box.