Complete step-by-step instructions for assembling a simplex truffle box. Learn the proper techniques for this specialty candy box design.
-
Introduction to the truffle box
This little structure represents BRP Box Shop's first pure peregrination into candyland. We have been working on making candy boxes available to you for a long time. This box bears the fruit of our candy-loving efforts as box makers. Early interest has been terrific and we hope you like it!

-
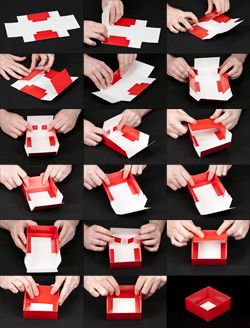
Start with the flat box blank
Normally, the first step to erecting a square and proper box, is pre-breaking the paperboard on the scores. Such is the case for this candy bottom base but with a noteworthy exception. Do you see the panels with the glued side walls? Only fold those to a maximum of 90 degrees.

-
Careful with glued walls - 90� maximum
For the other panels, it is no problem to fold those flaps over, all of the way - 180 degrees. Over folding the glued walls, however, could stress the paper to its breaking point, cracking the printed surface along the bottom edge.
Warning: Only fold glued side walls to 90� maximum to prevent cracking!

-
Pre-break other panels to 180�
Continue pre-breaking the non-glued panels to 180 degrees for easier assembly.

-
Continue pre-breaking process
Work through all the panels systematically, maintaining the 90� limit on glued walls.

-
Work through all panels
Continue the pre-breaking process on all remaining panels.

-
Complete pre-breaking preparation
Finish the pre-breaking process on all panels.

-
Final pre-breaking steps
Complete the final pre-breaking steps to prepare for assembly.

-
Examine the corner gussets
If you look at the corners of your unfolded box blank, you'll see the box's gussets. This particular piece of box anatomy has an angled line of perforated paperboard to make folding it in half as easy as possible.

-
Fold gussets as panels come up
The gussets in the corners of the box fold in as the end panel and sides are folded up.

-
Fold gussets in half along perforation
Once the outer panels are square, the gussets are folded in half along the perforated angle. Hold the folded gussets against the inside of the end panel before performing the next step.

-
Gusset tabs provide structural support
You can see how the extended tabs on the gussets provide structural support for the crease on the end panel once it is folded over. Not only does this help in making the finished box true and plumb and square, it also reinforces the top edge of the box to make it stronger.

-
Keep gussets tight for panel swing
The trickiest part of the assembly is keeping the gussets tight enough against that inside wall to allow for the end panel to swing down and lock into place.

-
Swing end panel to inside
Swinging the end panel to the inside of the truffle box base is where pre-breaking the folds really pays off. The gusset tabs should snuggle right under the crease of that score under the apex of the wall.

-
Tilt panel all the way down
Tilt the panel all the way down into the box so the two pieces of parallel paperboard kiss and the foot at the bottom of the box finds home behind the fixed feet of the glued side panels.

-
Push L-shape into corner for lock
It is important to make sure the L-shape of the structure gets pushed far enough into the corner to allow for a positive lock. This keeps your freshly pushed panel in place.

-
Finish the final wall
Finishing the final wall is easy. Get those gussets folded snug and simply swing that last panel like closing an old-timey garage door.

-
Swing final panel like garage door
Continue swinging the final panel down into position.

-
Complete final panel assembly
Complete the final panel assembly process.

-
Base assembly complete
The base assembly is now complete and ready for the lid.

-
Bases and lids sold separately
These candy box bases are sold separately from the lids. You can mix or match colors for your tops and bottoms. When you finally join your selected lid to your poised little base, make sure you line up the front of the lid with the front of the base.

-
Match corner pleat orientations
The best way to line up the lid and base is to observe the pleats on the corners of each. Match the orientation of the lid to the base and you've got yourself a fine looking treasure chest fit for stowing and showing sweets.

-
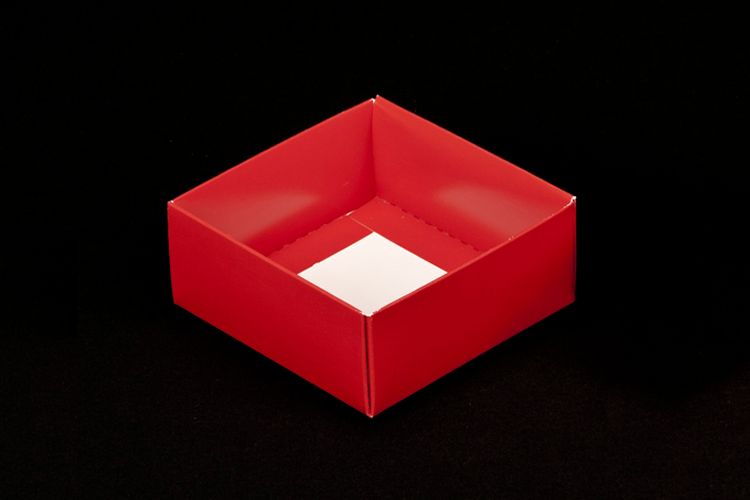
Completed truffle box treasure chest
Your completed truffle box is now ready - a fine looking treasure chest fit for stowing and showing sweets.